Vitepress Complete Guide
Getting Started
In this site i will show you how to install, configure and deploy vitepress.
Deploy will be on Kubernetes using custom helm chart.
Additionally, we create the Dockerfile with github actions and push it to our ghcr.io repo.
Have fun 😄
Requirements
IMPORTANT
- Node.js version 18 or higher
- Kubernetes Cluster
- Github account
- Helm Package Manager
- Visual Studio Code or other code editor
- Official Vue extension for Visual Studio Code
Install vitepress
VitePress can be used on its own, or be installed into an existing project.
In both cases, you can install it with:
npm add -D vitepressSetup Wizard
VitePress ships with a command line setup wizard that will help you scaffold a basic project. After installation, start the wizard by running:
npx vitepress initYou will be greeted with a few simple questions:
┌  Welcome to VitePress!
│
◇  Where should VitePress initialize the config?
│  ./docs
│
◇  Site title:
│  devops.bayern
│
◇  Site description:
│  A documentation site
│
◆  Theme:
│  ○ Default Theme (Out of the box, good-looking docs)
│  ● Default Theme + Customization
│  ○ Custom Theme
└
We will customize a little bit the default theme.
Install all necessery packages
npm i && npm fundYou can start now with:
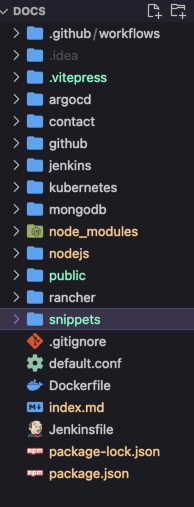
npm run docs:devFile structure
This an example, how my file structure looks like.
Vitepress config
This is an example of my config.
Please read the official documentation and adjust config to your needs.
Vitepress Site Config
import { defineConfig } from 'vitepress'
import { tabsMarkdownPlugin } from 'vitepress-plugin-tabs'

export default defineConfig({
  markdown: {
    config(md) {
      md.use(tabsMarkdownPlugin)
    }
  },

  head: [['link', { rel: 'icon', href: '/favicon.ico' }]],
  lang: 'en-US',
  title: "devops.bayern",
  description: "documentation",
  themeConfig: {
    logo: '/devops.png',
    footer: {
      message: 'Released under the <a href=https://opensource.org/license/mit target="_blank">MIT License</a>.',
      copyright: 'Copyright © 2024 devops.bayern'
    },

    nav: [
      { text: 'Home', link: '/' },
      { text: 'Contact', link: '/contact/contact' }
    ],

    sidebar: [
      {

      }
    ],

    socialLinks: [
      { icon: 'github', link: 'https://github.com/tron4x' }
    ]
  }
})
vitepress-plugin-tabs must be installed and configured to work.
Documentation can be found here
Dockerfile
The Dockerfile must be in the root directory of our vitepress app.
See the section on file structure
FROM node:alpine3.20 AS base
RUN apk add --no-cache libc6-compat git

# Install build dependencies
FROM base AS deps
WORKDIR /app
COPY package.json package-lock.json ./
RUN npm ci

# Build static website
FROM base AS builder
WORKDIR /app
COPY --from=deps /app/node_modules ./node_modules
COPY . .
RUN npm add -D vitepress
RUN npm run docs:build

# Use nginx to serve the static website
FROM nginx:stable-alpine AS final
WORKDIR /usr/share/nginx/html
COPY --from=builder /app/.vitepress/dist ./
COPY default.conf /etc/nginx/conf.d/default.conf

# Expose necessary ports
EXPOSE 8080 8443

# Start nginx
CMD nginx -g 'daemon off;'
default.conf is similar to this here
Github Actions - Workflow
INFO
Youe have to set:
- github account ( username )
- github token
IMPORTANT
How to create personal access token ( classic ) can be found here
This workflow creates the docker image and push it to our ghcr.io package repository.
name: Docker Image CI

on:
  push:
    branches: [ "main" ]
  pull_request:
    branches: [ "main" ]

jobs:

  build:

    runs-on: ubuntu-latest

    steps:

    - name: 'Login to GitHub Container Registry'
      uses: docker/login-action@v1
      with:
        registry: ghcr.io
        username:  <your username>
        password: <your github token>

    - uses: actions/checkout@v4
    - name: Build the Docker image
      run:  |
        docker build . --tag ghcr.io/<account>/docs:1.1
        docker push ghcr.io/<account>/docs:1.1
Kubernetes Helm Chart
Helm Chart for Kubernetes can be found on my public repo in Github
Please read the README file for instructions.